Foolproof Caramel Glaze: Elevate Any Dessert with Ease
Imagine a drizzle of rich, buttery, golden caramel cascading over your favorite dessert, instantly transforming it from delicious to absolutely divine. That’s the magic of a truly great easy caramel glaze recipe. Far too often, the thought of making caramel from scratch evokes images of burnt sugar, sticky messes, and the dreaded candy thermometer. But what if we told you there’s a foolproof method, a true baker’s secret, that allows you to achieve that dreamy caramel perfection with astonishing ease? This article is dedicated to unlocking that secret, providing you with a caramel glaze recipe that is not only simple to master but guaranteed to elevate any treat you pair it with.
Whether you're dressing up a humble biscuit, enhancing a grand bundt cake, or adding a touch of gourmet flair to apple slices, this homemade caramel glaze is your ticket to dessert nirvana. Get ready to impress your friends, family, and even yourself with this incredible, no-fail creation.
Why a Foolproof Caramel Glaze is Your Dessert Game-Changer
In the world of baking, few additions possess the transformative power of a perfectly crafted caramel glaze. It’s more than just a topping; it's a flavour enhancer, a textural delight, and an instant upgrade to virtually any sweet treat. For those who typically shy away from caramel, fearing the intricate process, this particular caramel glaze recipe is a revelation.
Traditional caramel making often involves precise temperature control, careful watching, and a degree of patience that can test even the most seasoned bakers. The beauty of this foolproof version lies in its simplicity. It cleverly bypasses many of the traditional pitfalls, allowing you to achieve a deep, rich caramel flavor without the stress. As many professional bakers will attest, when you need to quickly elevate a dessert without the fuss of whipping up a full buttercream, a homemade glaze is the ultimate shortcut. It soaks into cakes and muffins, adding an insane amount of flavor and moisture, truly acting like a "magical drizzle."
The versatility of this glaze is astounding. Consider it a universal passport to dessert excellence. Here are just a few ideas for its application:
- Cakes & Bundt Cakes: From a classic vanilla to a spiced pumpkin bundt, a generous pour of this glaze will make it unforgettable.
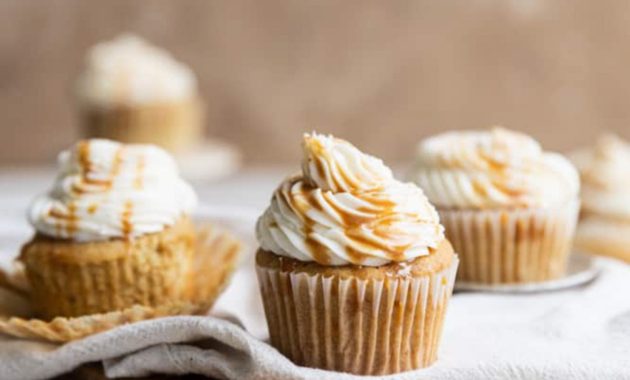
- Cupcakes & Muffins: Drizzle over your morning muffins or add a sophisticated touch to celebratory cupcakes.
- Pies & Tarts: A finishing touch that brings warmth and depth to apple, pecan, or even pumpkin pies.
- Breakfast Pastries: Transform plain biscuits, cinnamon rolls, or monkey bread into indulgent delights.
- Fruit: Elevate simple apple slices, banana bread, or even a fruit salad.
- Ice Cream: Forget store-bought syrups; this homemade glaze is a game-changer for sundaes.
This isn't just a recipe; it's an invitation to effortlessly take your desserts to the next level, adding that coveted deep caramel flavor that everyone adores. For even more quick tips on making this type of glaze without a thermometer, you'll want to check out our guide on Quick Caramel Glaze: No Thermometer, Baker's Secret for Amazing Desserts.
Unlocking the Secret: The Easy Caramel Glaze Recipe
The secret to this caramel glaze recipe lies in a clever combination of ingredients and a simplified cooking method that sidesteps the usual complexities. You won't need a candy thermometer, and you won't be standing guard, nervously stirring and praying it doesn’t burn. Instead, you'll whisk together a few pantry staples in a saucepan, allowing them to melt and meld into that "liquid gold" we crave.
Ingredients You'll Need (and Why They Matter)
This recipe calls for a handful of common ingredients, each playing a crucial role in creating the perfect balance of flavor and texture:
- Brown Sugar: This is the star of the show. Unlike white sugar, brown sugar contains molasses, which provides that signature deep, rich caramel flavor and a beautiful golden-brown hue. Make sure to break up any large clumps before you begin to ensure a smooth glaze.
- Butter: Adds richness, a silky texture, and helps to emulsify the glaze, preventing it from becoming too sticky or separating. Good quality butter makes a noticeable difference.
- Milk (or Cream): Introduces moisture and helps control the consistency. Using cold milk is fine, but be prepared for a significant foam-up when it hits the hot sugar and butter mixture (this is normal!). Heavy cream will yield an even richer, thicker glaze.
- Vanilla Extract: A crucial flavor enhancer. Added at the end, it brightens and rounds out the caramel notes.
- Pinch of Salt: Essential for balancing the sweetness and enhancing the overall flavor profile of the caramel.
Beyond the ingredients, a trusty heavy-bottomed saucepan is your best friend. Its even heat distribution prevents scorching, which is key for any stovetop glaze. Look for one with higher sides, as the mixture will foam up, especially when the cold milk is added.
Step-by-Step Guide to Liquid Gold
Here’s how to bring your foolproof caramel glaze to life:
- Melt the Base: In your heavy-bottomed saucepan, combine the brown sugar, butter, and a pinch of salt. Place over medium heat.
- Whisk to Combine: As the butter melts, begin to whisk continuously. The mixture will come together, forming a thick, bubbly, and somewhat foamy syrup. Continue whisking until the sugar has completely dissolved and the mixture is smooth.
- Introduce the Milk: Carefully pour in the cold milk (or cream). *Be prepared for the mixture to foam up vigorously!* This is a normal reaction as the colder liquid hits the hot sugar. Keep whisking gently.
- Simmer and Thicken: Continue to cook and whisk over medium heat. The bubbles will subside, and the mixture will begin to simmer gently. Allow it to cook for a few more minutes, whisking occasionally, until it thickens slightly. It will still be quite thin at this stage, but you'll notice it coating the back of a spoon.
- Remove and Flavor: Take the saucepan off the heat. Stir in the vanilla extract.
- Cool and Drizzle: Allow the glaze to cool slightly before drizzling over your chosen dessert. This is important: if it's too hot, it will simply seep into the cake rather than coat it beautifully. As it cools, it will continue to thicken to a perfect pouring consistency.
Mastering Your Caramel Glaze: Tips for Perfection
While this caramel glaze recipe is inherently foolproof, a few simple tips can help you achieve absolute perfection every time.
Consistency is Key: Thick vs. Thin
The desired thickness of your caramel glaze often depends on its application. Luckily, adjusting the consistency is straightforward:
- For a Thinner Glaze: If your glaze becomes too thick upon cooling, simply warm it slightly. You can do this gently on the stovetop over low heat, or in the microwave in 15-second intervals, stirring in between. A tiny splash of milk can also help thin it out.
- For a Thicker Glaze: As the glaze cools, it naturally thickens. For an extra thick, almost spreadable consistency (though still pourable), refrigerate it for a longer period. The longer it chills, the more it will firm up. You can also slightly reduce the initial amount of milk in the recipe for a naturally thicker base.
Troubleshooting Common Glaze Hurdles
Even with a foolproof recipe, minor hiccups can occur. Here’s how to navigate them:
- Grainy Texture: This usually means the brown sugar didn't fully dissolve. Ensure you whisk continuously at the beginning, breaking up any clumps, and let the mixture simmer long enough for all sugar crystals to melt.
- Separated Glaze: If your glaze looks oily or separated, it might be due to too much heat or insufficient whisking. Try whisking vigorously off the heat, or gently re-warm and whisk until emulsified again.
- Too Dark/Burnt Taste: While less common with this recipe, always use medium heat and a heavy-bottomed pan. If you smell even a slight burnt aroma, it's best to start over.
Creative Ways to Drizzle and Decorate
Beyond simply pouring, think about presentation! Use a spoon for rustic drizzles, or transfer the cooled (but still liquid) glaze into a piping bag with a small round tip for more intricate patterns. A small offset spatula can also create beautiful swirled effects on cakes. Remember, this glaze isn't just about taste; it's a beautiful garnish too.
Storing Your Homemade Caramel Glaze
One of the many advantages of this easy caramel glaze recipe is its excellent shelf life, allowing you to prepare it in advance or save leftovers for future dessert emergencies.
To store your caramel glaze, first allow it to cool completely at room temperature. Transfer it to an airtight container or a glass jar with a tight-fitting lid. Seal the container tightly and refrigerate for up to 2 weeks. Before using, simply warm the glaze gently on the stovetop over low heat or in the microwave in short bursts, stirring until it reaches your desired drizzling consistency. If it seems too thick after chilling, you can whisk in a teaspoon or two of warm milk to thin it out.
Conclusion
You now hold the key to a truly foolproof caramel glaze recipe – a culinary gem that promises to elevate your baking endeavors without any of the usual stress associated with caramel making. This easy-to-follow guide ensures a rich, buttery, and utterly delicious glaze every single time, ready to transform everything from simple slices of apple to elaborate bundt cakes into extraordinary delights. It’s more than just a recipe; it's a confidence booster, a testament to the fact that gourmet flavors can be achieved with surprising ease. So go ahead, embrace the magic, and get ready to drench your favorite treats in this liquid gold. Your taste buds (and your guests) will thank you!
